
In this article, I will provide a step-by-step tutorial on How to Create and Run a Node on Forta Network. This tutorial is quite lengthy, so please follow each step carefully to avoid any errors. But first, let’s learn about Forta Network and the purpose of its Node.
What is Forta Network?
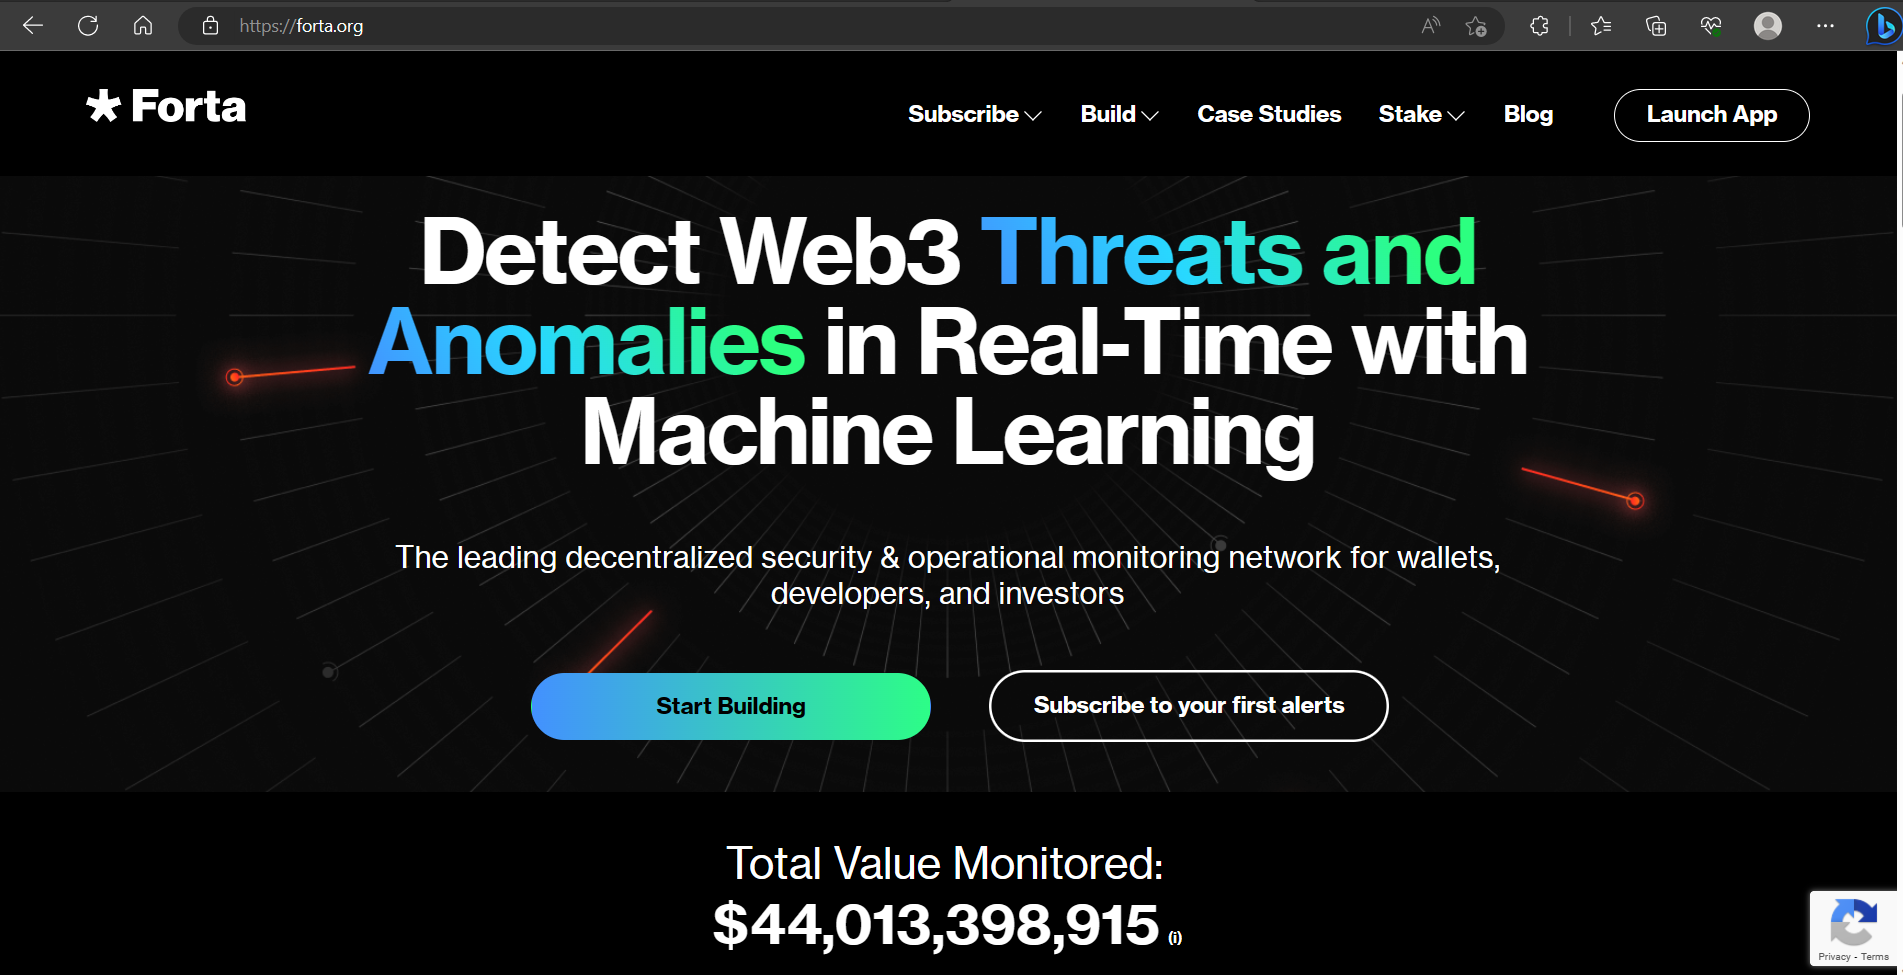
Forta is a real-time detection network for blockchain security and operational monitoring activities. It is a decentralized community-based monitoring network that detects threats and anomalies in DeFi, NFT, governance, bridges, and other Web3 systems in real-time. By providing timely and relevant alerts about the security and health of owned or dependent systems, protocols, and investors can react quickly to neutralize threats and prevent or minimize fund loss. Forta consists of a decentralized network of independent node operators that scan all transactions and block status changes block by block for conspicuous transactions and threats. When an issue is detected, node operators send alerts to customers about potential risks, enabling them to take action. With Forta, developers can build detection bots and machine learning models and run them on the decentralized Forta network to uncover anomalous activities in any blockchain transaction. Forta will be secured and governed by smart contracts and the use of FORT and governance token utilities.
What is a Scan Node?
A Scan Node is a crucial part of the Forta infrastructure as it helps to run bots and share any alerts. The best way to expand the network is by running your own scan node and making bandwidth to run more bots.
How to Create and Run a Scan Node
Here are the step-by-step instructions on how to create a node on Forta Network and run it to potentially earn staking rewards in $FORT.
Minimum Specifications
According to the official Forta Network documentation, the minimum specifications for running a node are as follows:
- 64-bit Linux distribution
- CPU with 4+ cores
- 16GB RAM
- Connection to the Internet
- Docker v20.10+
- 100GB SSD (in addition to full node requirements)
- Recommended: Full node (any chain)
Synchronize System Time
To generate accurate timestamps for alerts and avoid authorization issues while publishing alerts, you must ensure that your system time is correct. If the system time is incorrect, your node will fail to publish alerts and may not earn rewards.
I recommend using systemd-timesyncd, which is widely available and adequate as a time synchronization daemon. Once run, it will periodically synchronize the system time in the background.
To enable systemd-timesyncd and check its status, you can do the following:
sudo systemctl enable systemd-timesyncd
sudo systemctl start systemd-timesyncd
Then, verify if the time has been successfully synchronized by running:
timedatectl status
If the output shows a message similar to the following and NTP is active, it means the time has been successfully synchronized:
Local time: Tue 2022-01-01 17:00:00 -03
Universal time: Tue 2022-01-01 20:00:00 UTC
RTC time: Tue 2022-01-01 20:00:00
Time zone: America/Argentina/Buenos_Aires (-03, -0300)
System clock synchronized: yes
NTP service: active <------------------- (it worked)
RTC in local TZ: no
Install and Configure Docker
Install Docker (at least v20.10).
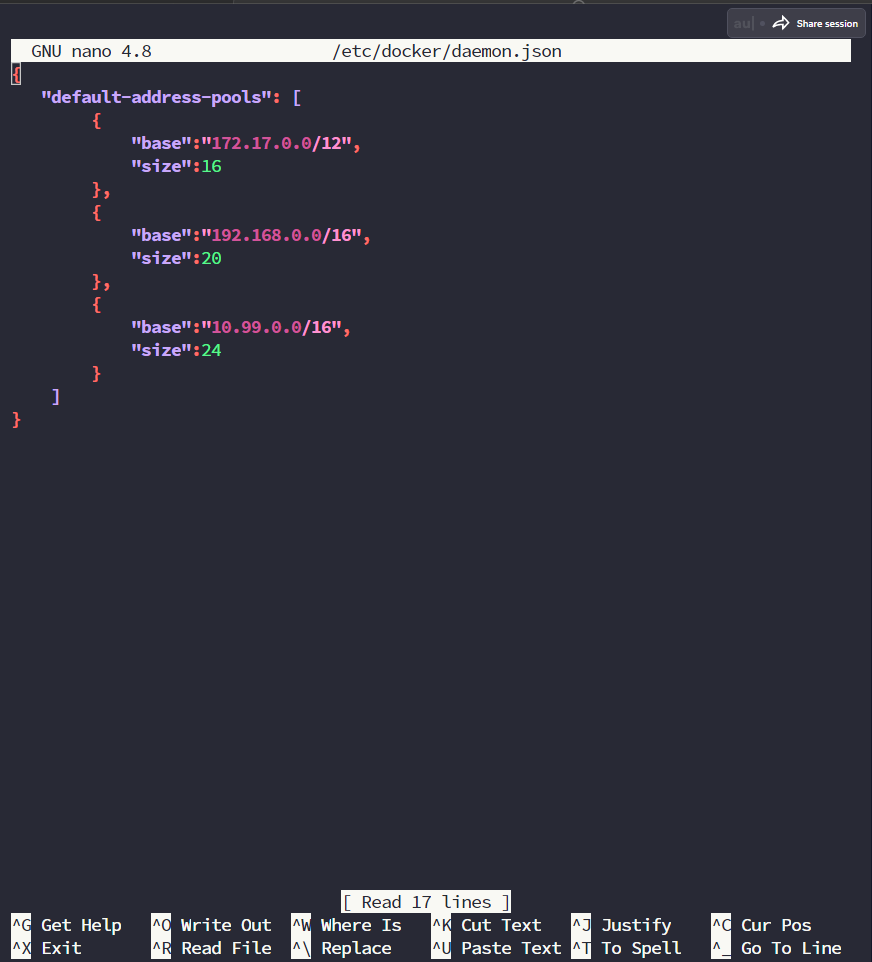
Add a file named daemon.json to your /etc/docker directory with the following content:
{
"default-address-pools": [
{
"base":"172.17.0.0/12",
"size":16
},
{
"base":"192.168.0.0/16",
"size":20
},
{
"base":"10.99.0.0/16",
"size":24
}
]
}
Install Forta
Forta scan node software is available for popular 64-bit Linux distributions using the official Forta repositories. The package installation method can be verified (automatically verified during installation) and helps you install the necessary dependencies.
Install via YUM (CentOS, Fedora, Red Hat Enterprise Linux, etc.)
sudo curl https://dist.forta.network/repositories/yum/Forta.repo -o /etc/yum.repos.d/Forta.repo
-s
sudo yum install forta
Install via APT (Ubuntu, Debian, etc.)
sudo curl https://dist.forta.network/pgp.public -o /usr/share/keyrings/forta-keyring.asc -s
echo 'deb [signed-by=/usr/share/keyrings/forta-keyring.asc] https://dist.forta.network/repositories/apt stable main' | sudo tee -a /etc/apt/sources.list.d/forta.list
sudo apt-get update
sudo apt-get install forta
Initial Setup
The Forta scan node CLI allows you to set up your first Forta configuration directory and manage your scan node’s private keys.
Initialize the Forta Directory
Initialization creates a private key that will sign alerts from your scan node. You must set the environment variable FORTA_PASSPHRASE or provide the --passphrase flag with the init command.
Initialize Forta using the following command:
forta init --passphrase <your_passphrase>
Note!: Replace
<your_passphrase>with your desired passphrase/password.
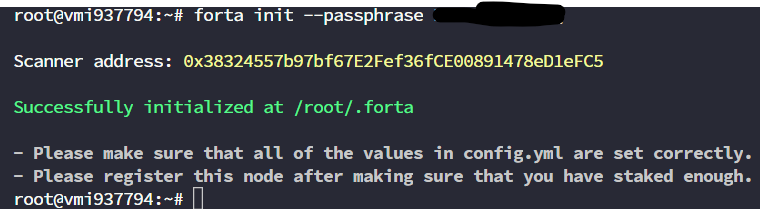 The command above will generate the config directory, a new private key, and your address.
Note!: Download and securely store your private key by downloading all files within the
.fortafolder.
Systemd Configuration
Systemd is used to run Forta Scan Node in the background and automatically restart it if it stops. Create a file named env.conf in the directory /etc/systemd/system/forta.service.d and enter the following code:
[Service]
Environment="FORTA_DIR=<your_forta_directory>"
Environment="FORTA_PASSPHRASE=<your_passphrase>"
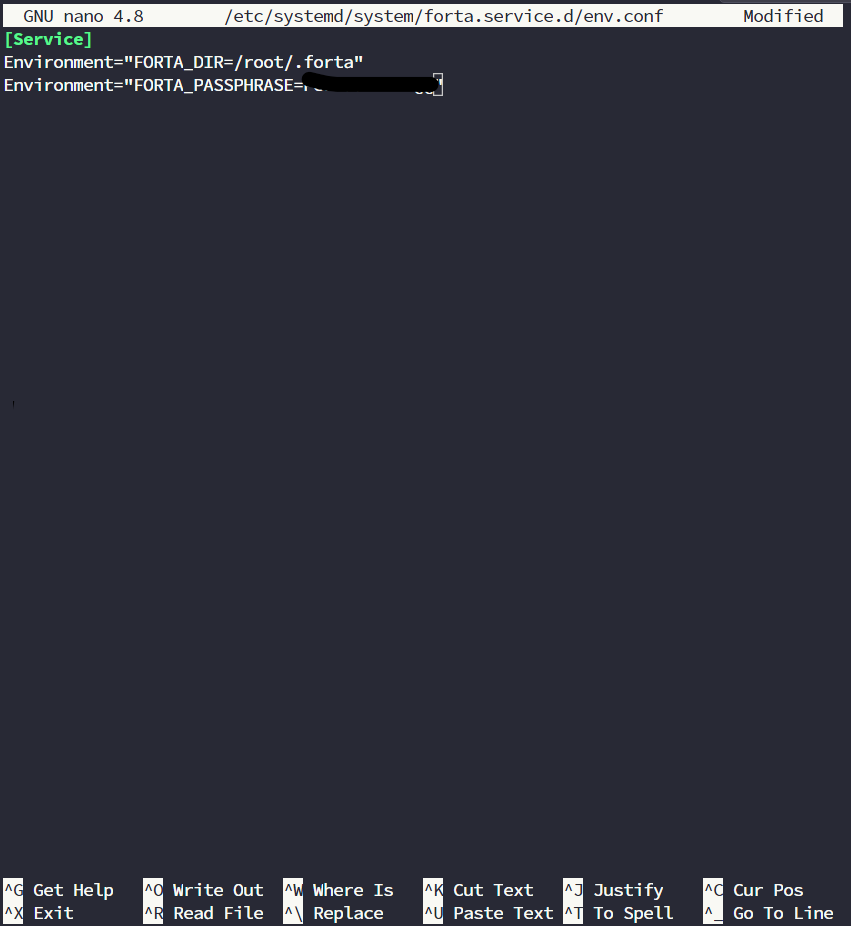 Note: Replace
 <your_forta_directory> with your Forta configuration directory, and <your_passphrase> with your predefined passphrase.
Chain API Configuration
Inside your Forta directory, there is now a config.yml file. You must configure this file to let your Scan Node know how to obtain blockchain data.
Your Scan Node will be registered to scan one specific blockchain. To allow your scan node to obtain blockchain data, you must provide a valid scan.jsonRpc.url.
Here is an example configuration for scanning Ethereum Mainnet using Alchemy Growth plan and HTTP endpoint:
chainId: 1
# The scan settings are used to retrieve the transactions that are analyzed
scan:
jsonRpc:
url: https://eth-mainnet.alchemyapi.io/v2/KEY
# This is needed only for scanning Ethereum Mainnet and Fantom
trace:
jsonRpc:
url: https://eth-mainnet.alchemyapi.io/v2/KEY
# Optional: Bots make extra requests to check the chain state. You can point
# them to a different reliable API by using this. This defaults to `scan.jsonRpc.url`.
jsonRpcProxy:
jsonRpc:
url: http://different-api:8545
Currently, Forta supports EVM Chains only, including BSC, Polygon, Avalanche, Arbitrum, Optimism, Fantom.
Below are the configuration codes for other chains besides Ethereum:
BSC
chainId: 56
scan:
jsonRpc:
url: https://bscrpc.com/
trace:
enabled: false
Polygon
chainId: 137
scan:
jsonRpc:
url: https://polygon-rpc.com/
trace:
enabled: false
Avalanche
chainId: 43114
scan:
jsonRpc:
url: https://rpc.ankr.com/avalanche
trace:
enabled: false
Arbitrum
chainId: 42161
scan:
jsonRpc:
url: https://rpc.ankr.com/arbitrum
trace:
enabled: false
Optimism
chainId: 10
scan:
jsonRpc:
url: https://rpc.ankr.com/optimism
trace:
enabled: false
Fantom
chainId: 250
scan:
jsonRpc:
url: https://rpc.ftm.tools/
trace:
jsonRpc:
url: https://rpcapi-tracing.fantom.network/
Register Scan Node
Make sure you have set the correct chainId in config.yml before registering your node. Your Scan Node can only be registered once and to scan a specific chain.
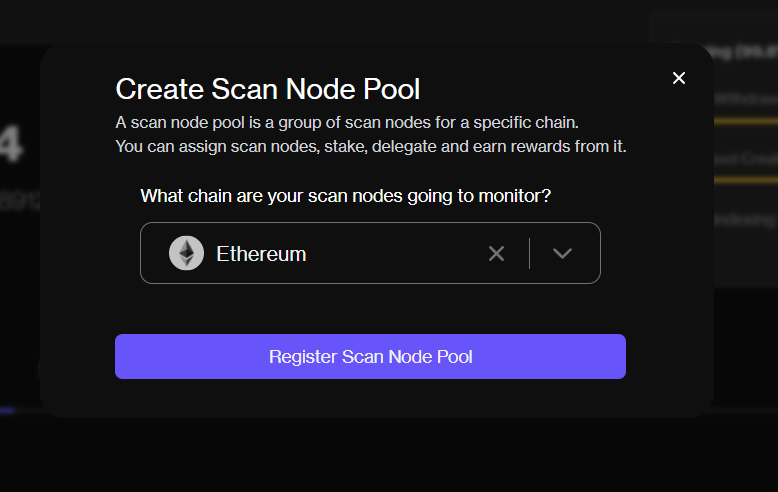
You must first create a Node Pool by visiting Forta App, connecting your wallet, then clicking My Node Pools and selecting Add Scanner Pool, choosing the Chain you want to register, and clicking **Register Scan Node
Pool**. Approve the transaction on your wallet.
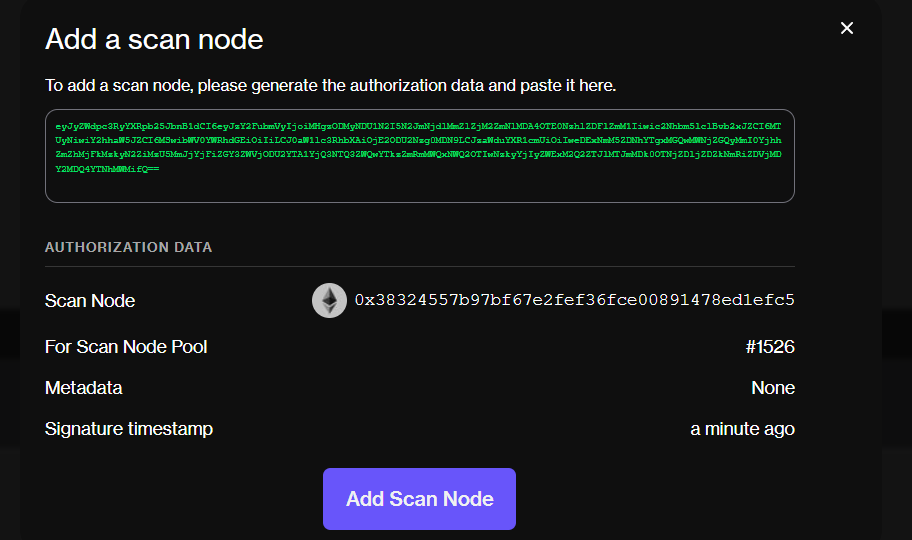
Next, you can register your node by:
- Running
forta authorize pool --passphrase <your_passphrase> --id <your_pool_id> - Copying the token to Forta App as explained on the scanner pool management page in the documentation.
Then, paste the output from forta register to complete the scan node registration.
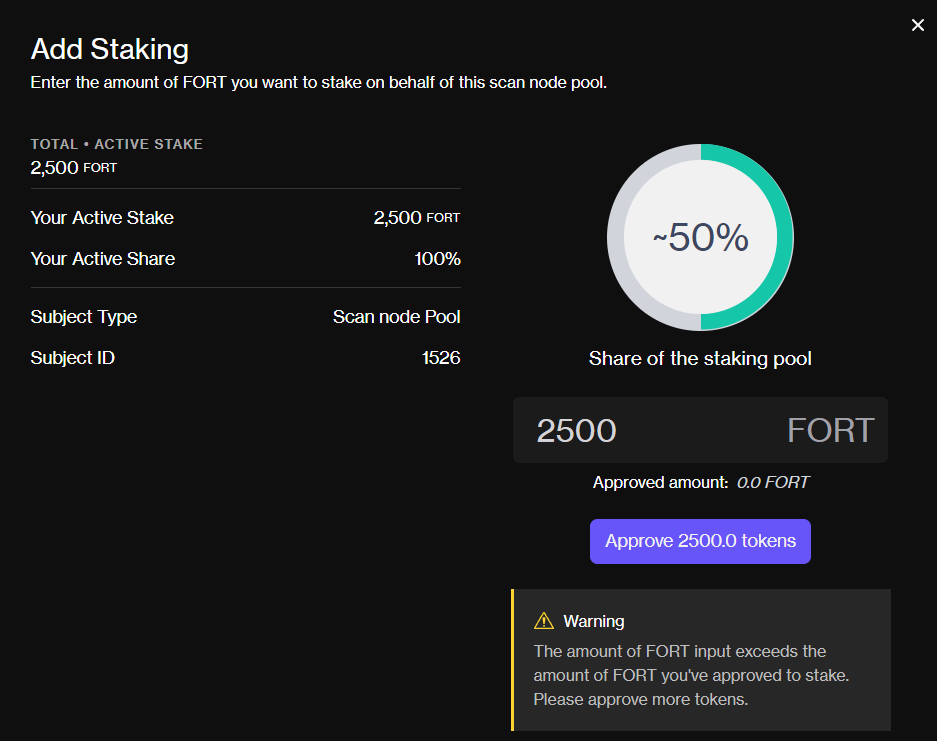
Stake FORT Tokens
You must stake a minimum of 2500 FORT tokens to activate your node and earn rewards. You can go to Forta App here and click My Node Pools.
Running Scan Node
After completing all the configurations above, you can now run your Forta node.
Start Forta via Systemd
Run the previously created Systemd:
sudo systemctl daemon-reload
sudo systemctl enable forta
sudo systemctl start forta
Start Forta Manually
You can also run Forta manually, but I do not recommend it as your Forta node will not start automatically when your VPS restarts.
forta run --passphrase <your_passphrase>
Check Forta Log and Status
After starting the Forta node, you can verify if the node is running properly and free of errors.
Check Docker Log
You can view the docker log of the forta-scanner container in real-time by running:
docker logs -f forta-scanner --tail 100
Check Forta Status
You can check the status of your Forta node to see if everything is running smoothly by running:
forta status
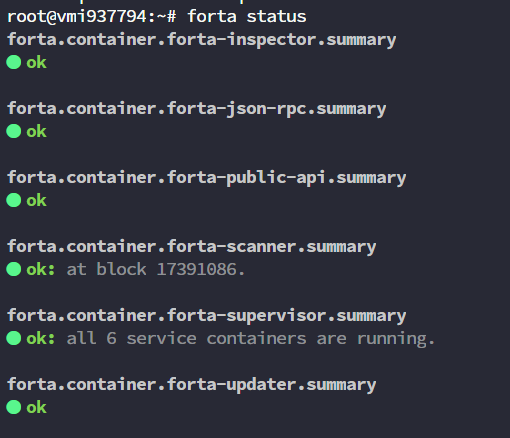 Ensure that all statuses are green, indicating that all Forta services are running smoothly without any errors.
Conclusion
Congratulations! You have now successfully created and run your Forta node. Next, you just need to wait for your $FORT rewards to arrive. Forta rewards are distributed weekly.
That concludes the tutorial on How to Create and Run a Node on Forta Network. Happy scanning!